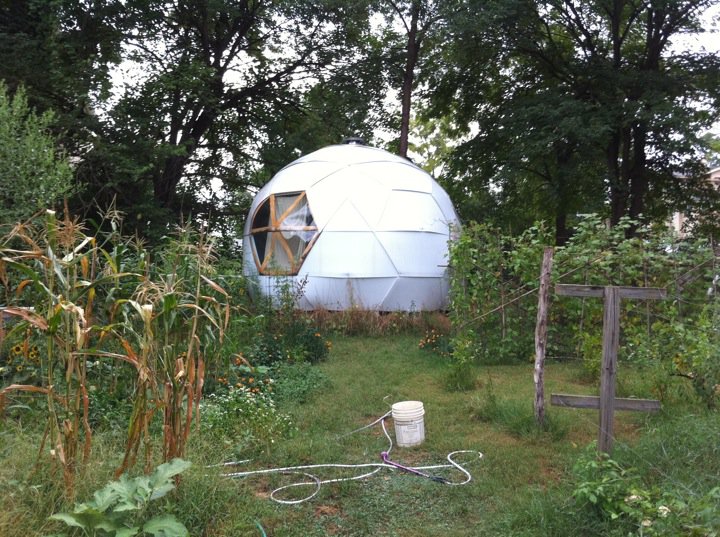

What is it?
It’s a frameless geodesic dome designed to be easy to fabricate and build.
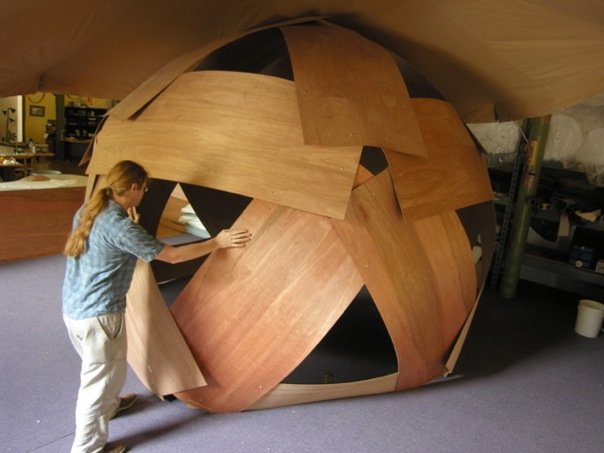
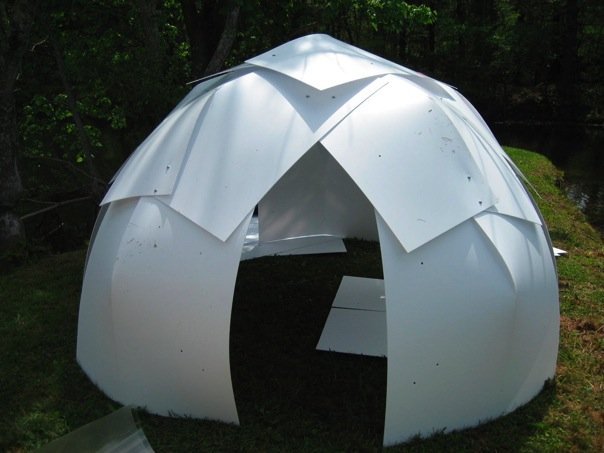
It is 18 feet wide at the widest point and about 13 feet tall. It feels very spacious for it’s 209 square foot floor.
The dome shell is built out of 3/16” corrugated plastic and 3/4” blueboard foam insulation. The shell of the dome is a basically a foam board insulation sandwich. There is an outer plastic dome, two layers of tightly fitted blueboard insulation and then an inner plastic dome. It’s all held together with bolts that bolt through all the layers. The shell of the dome is about 2 1/2 inches thick.
There is no frame in this dome. The shell is self supporting much like and igloo is self supporting.
The dome has a radial 2x4 floor system held up by cinder blocks. The floor is also insulated with 2 layers of blueboard foam insulation.
It has electricity and is heated with a single electric radiator and is cooled with an exhaust fan and small window sized air conditioner.
The materials are all easily attainable and it cost about $2100 to build it at the time.
The dome shell is also extremely easy to disassemble making it a portable structure.
Hacking housing
If I want to spend my time writing blog posts, exploring new programming languages, and other things that I want to do but I am unlikely to get paid for, it’s helpful to opt out of certain common expenses. Housing is a major expense that is ripe for pruning.
Conventional housing requires that we spend a tremendous amount of energy and money to construct and maintain a home. The comfort and living convenience that we get from these large and inefficient houses does not increase linearly with their higher cost. There is a decreasing marginal efficiency as investment in a home goes up. This extra cost often translates into a lifetime of working (often working on something you don’t care about) in order to service rent or mortgage debt.
As the reality of our modern economic situation continues to decimate all faith in the American dream, it would be nice to literally think outside of the box and finally listen to the call of Buckminster Fuller exhorting us to use our intelligence and modern materials to transcend the idea that housing is a scarce resource.
The growing tiny housing movement is evidence that a lifestyle unburdened by exhorbent housing costs is becoming an attractive option for many people.
Advocacy
Being a builder and noticing early on how expensive housing is I have had a lifelong fascination with alternative structures. Having built and lived in a variety of structures over the last 22 years I can say that alternative structures are not all created equal. The difference in the ability of these different structures to shelter and provide a nice place to live is dramatic.
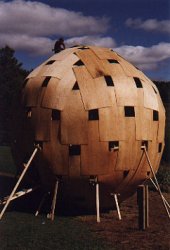
The frameless dome pictured above is the culmination of my experience with these structures. Three and a half years after building it I am ready to advocate it as an excellent alternative lightweight structure. I think this frameless dome balances many of the trade-offs of lightweight structures and arrives at an optimal structure that drastically minimizes construction complexity, time and price while maximizing livability.
All the materials in the dome are easily sourced and you only need standard carpentry tools to build one. The frameless dome doesn’t require special hardware, hubs, tools or materials. You can build one with the right patterns and sheeting with a standard carpentry tool kit.
This dome is very inexpensive and has a construction cost which is comparable to the price of other lightweight structures (teepee, yurt, canvas dome). At the same time the frameless dome provides a living area that is protected by a solid insulated waterproof shell. This is absent in these other lightweight structures.
The short construction time of this dome is remarkable. I attribute this to a very low number of parts and part types compared to other domes. The parts are also very light and easy to handle individually. The pieces for the dome can be cut out and assembled in three to five days by a couple people working at a very human pace. That estimate includes building the floor, windows, door etc.
The fast construction time is mirrored by an equally fast disassembly time, making the structure portable. With only a couple pickup truck loads of material you can move the shell to a new spot. Of course the portability of the entire structure will be highly impacted by the design decisions that reach beyond the shell of the structure.
The geometry of a geodesic dome is a natural stumbling block for many people. The frameless dome breaks this geometry down into a set of pentagons and hexagons positioned exactly as they are in a soccer ball. This structural pattern is intuitive after spending a few minutes holding and studying an actual soccer ball. It is possible to see how the cut out pieces relate to the dome being built, no crazy math required.
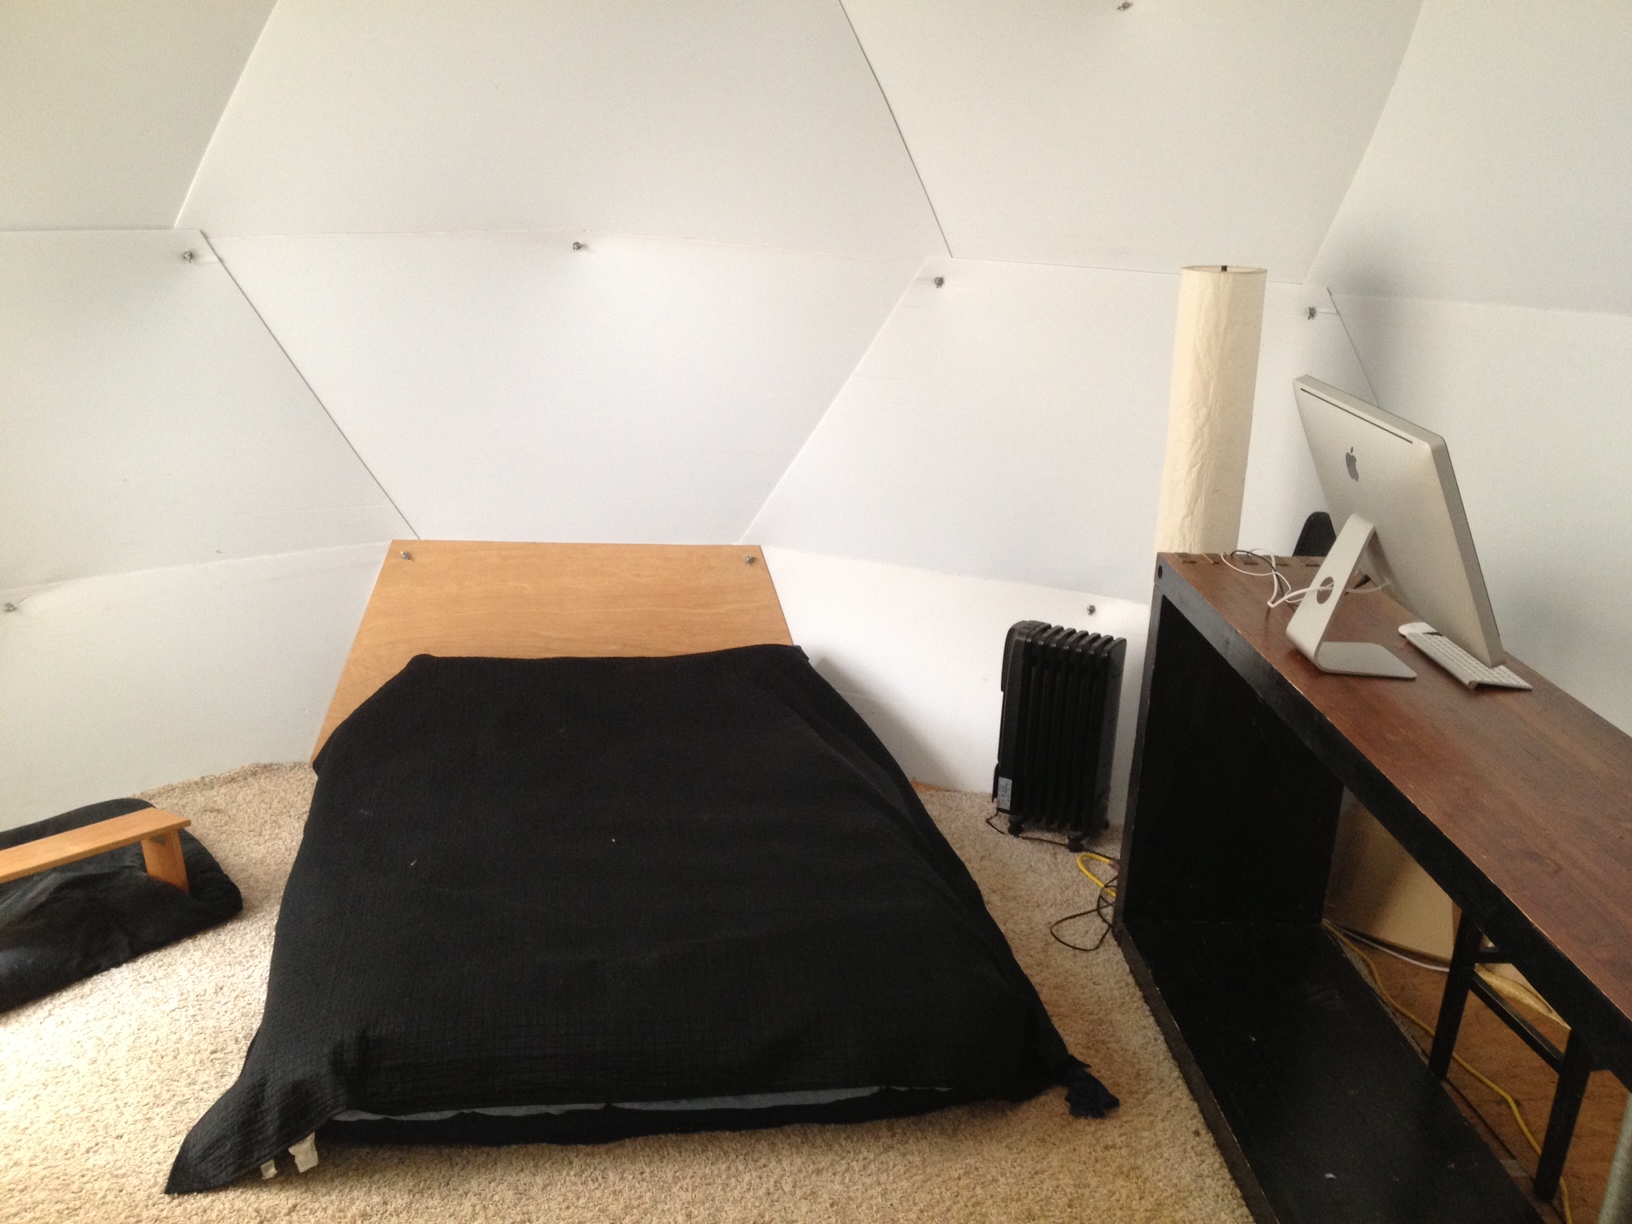
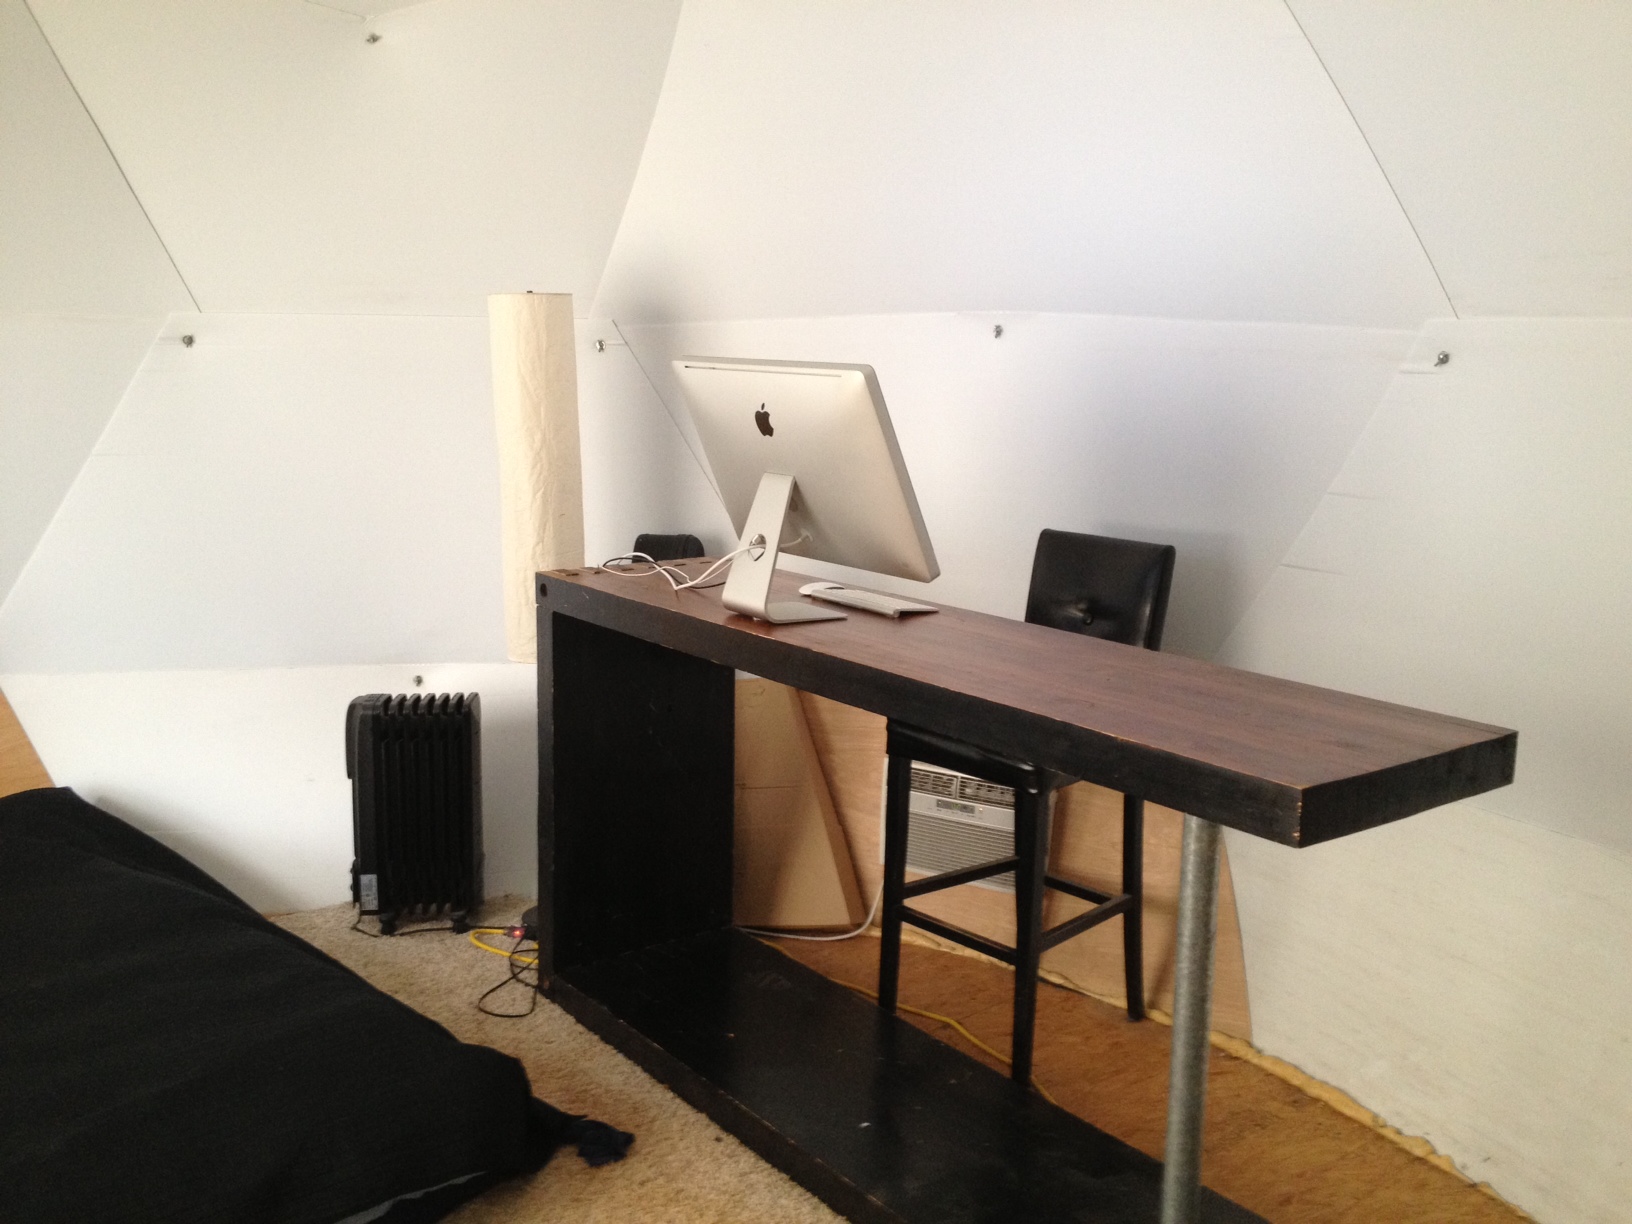
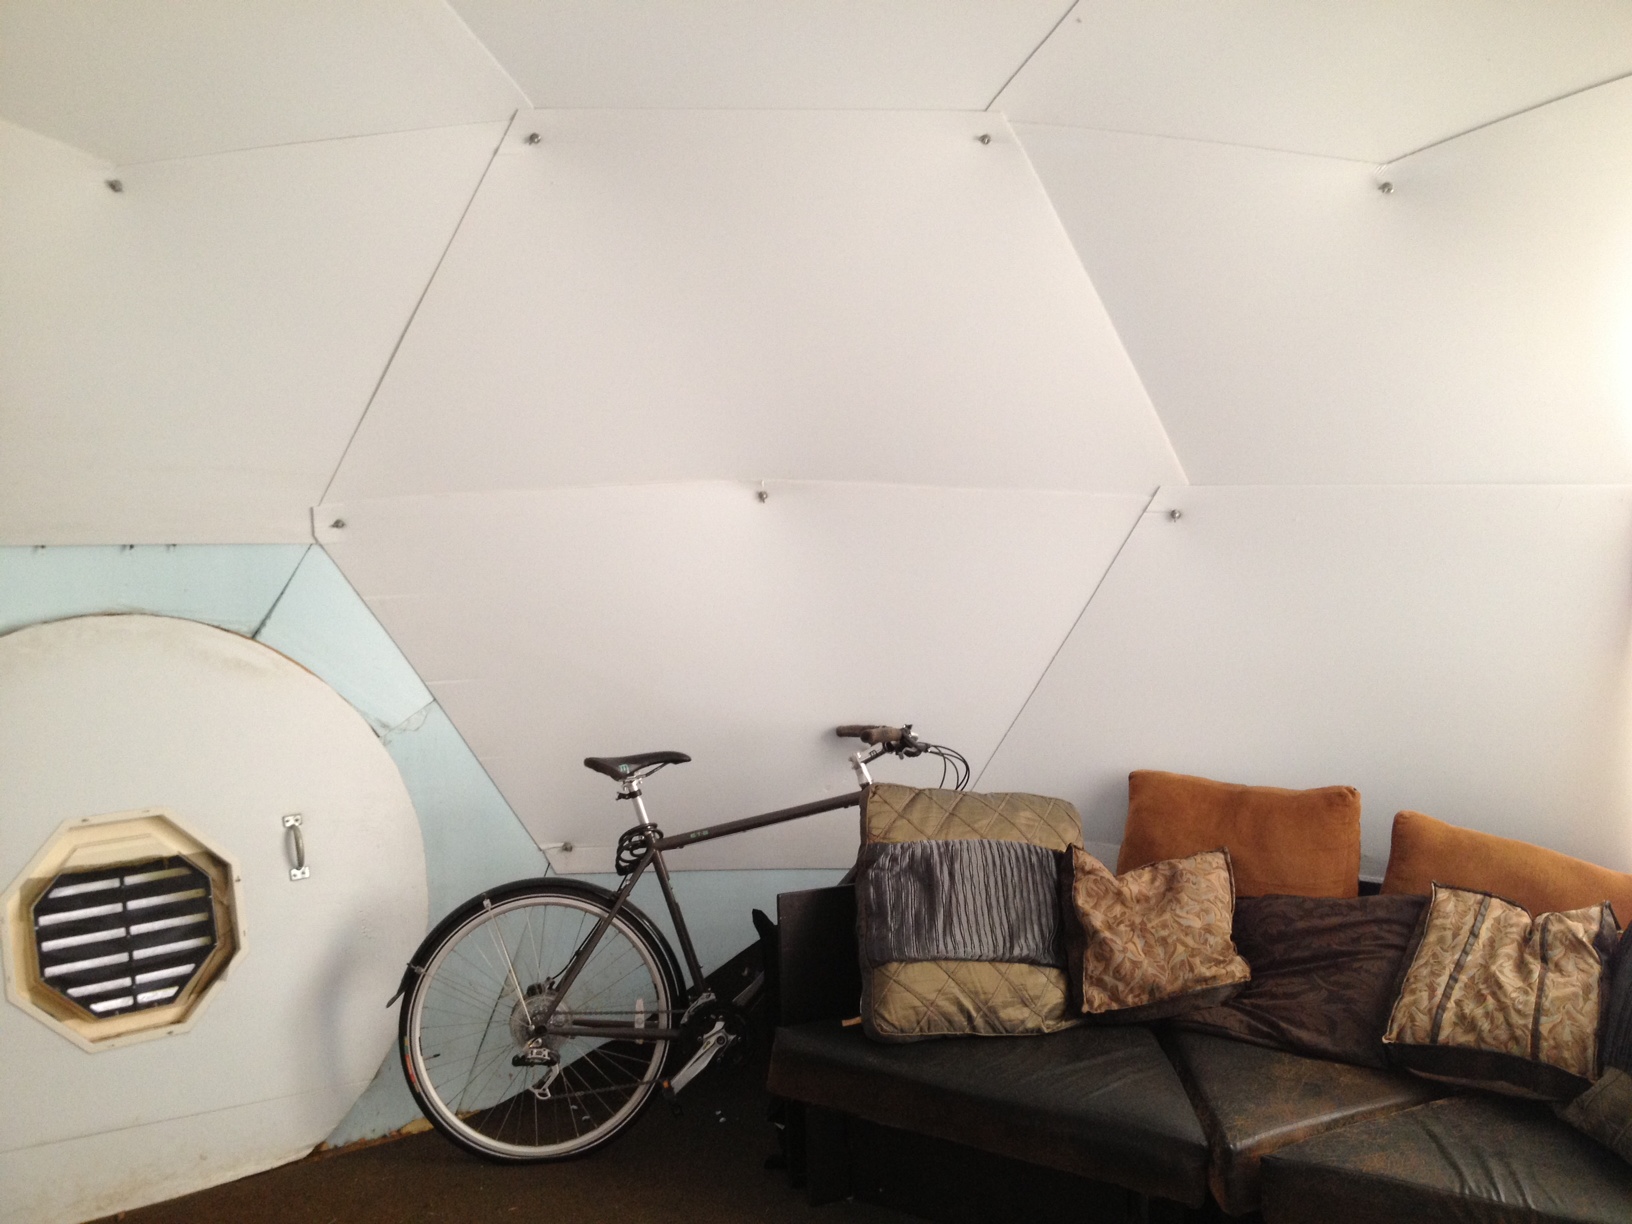
The living space of the dome feels open, clean, spacious and novel. There is a sense that you are not compromising but rather living in a space that is actually nicer than many conventional living quarters. I can’t really emphasize this enough: the dome is an absolute pleasure to live in.
Environmentally speaking the total energy input of the structure is a tiny fraction of what is used in conventional construction. The polypropylene plastic is as benign as plastic can be and is 100% recycled and recyclable.
Solar gain
Like many small structures solar gain can potentially be a problem in the dome during the summer.
My dome is nestled in a group of deciduous trees which shade 60% of the dome during the summer. There is a conventional home exhaust fan mounted on top of the dome. With the tree shade, the insulation and the exhaust fan it is possible to maintain the temperature of the dome close to the shade temperature outside. If it is still too warm inside a small air conditioner is adequate enough to cool the interior.
While solar gain is a problem in the summer it is welcome in the winter and can provide quite a bit of needed heating.
Plastic breakdown
The polypropylene in the corrugated plastic is expected to break down in UV solar radiation after a period of a few years. Three and a half years later this hasn’t been a noticeable problem. Right now I am expecting that I will only need to replace a few of the exterior sheets which are receiving the bulk of solar exposure. The cost of 4 or 5 sheets of material every few years is comparable to cost of paint. The effort required to replace the sheets is minimal as well.
Tackling dome complexity
Here is a model of the basic geodesic geometry of the dome:
 Download Google Sketchup model of the dome
The geodesic dome is brilliant in how it minimizes the amount of materials needed to enclose a given space. However, it accomplishes this by dramatically increasing the geometric complexity of the structure.
Since my aim here is to demonstrate a way to reduce the complexity of dome construction it’s helpful to have a way to quantify this complexity with a number.
I am going to use the number of parts required to build a dome as a measure of complexity. The part count of a project is a good proxy for how much raw work you are going to be putting into it. You have to fabricate and assemble all those parts and that takes time, money and energy.
If you were to take a standard approach to building a dome where you fabricate a frame and apply triangle sheathing, insulation and interior covering to it you are looking at 288 frame parts and 405 triangles. For the 18 foot wide dome above, not including fastening hardware, that’s a total of 693 parts!
With a very conservative estimate of six minutes per part of total handling time, that’s almost 9 8 hour working days just for the outer shell of a dome. That doesn’t include a floor system for the dome to sit on. For an 209 square foot structure this is a lot of handling compared to conventional construction methods.
This is significant amount of complexity. Enough to cause me to be very wary before undertaking the construction of a dome.
My perception of domes changed when I saw Steve Miller’s plydome.
The idea is based on Buckminster Fuller’s Self-strutted geodesic plydome.
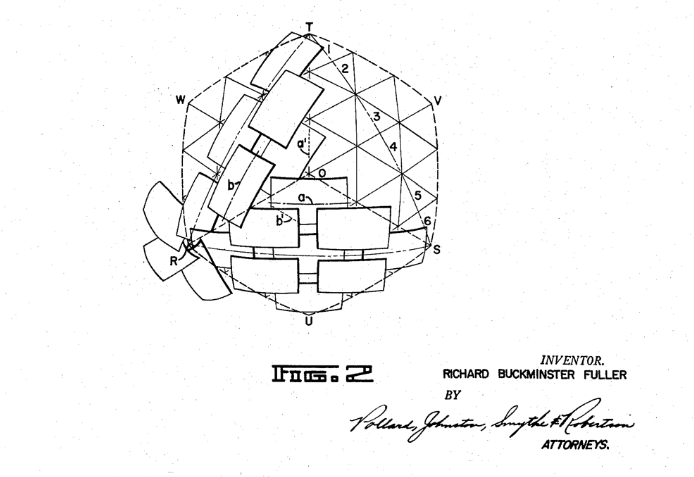
The plydome is a considerable departure from normal geodesic construction methods. There is no frame. The skin is the frame! No complex hubs needed. No need to fabricate a gazzilion triangles and struts.
The amazing idea behind the plydome is that by using the built in strength of the sheathing material under tension we get a frame and an enclosing envelope in one material. This drastically simplifies the construction of a dome.
A plydome reduces the part count significantly. One sheet of plywood replaces 7 struts, a couple of hubs and two plywood triangles and a lot of joining hardware. You are dividing the total parts needed by a factor of 7. Keep in mind a factor of 2 would rock. We are talking about a factor of 7. That is a dramatic improvement. If you needed 700 parts before, you now only need 100, a very significant complexity reduction.
My version of the frameless dome doesn’t follow the self strutting patent above. My dome, however, is greatly influenced by the idea that sheathing materials can work in synergy to induce structure and dramatically reduce construction complexity.
Frameless Synergy
In conventional wood housing (stick frame) construction, the insulation and weatherproof siding contribute nothing to holding the structure itself up. Even the external plywood sheathing is only used as a lateral brace for the 2x4 walls.
In my frameless dome the skin and the insulation serve more purposes than just waterproofing and insulation. The plastic skin serves as a weather proofing and provides structural tension to the layer below. The insulation insulates and provides the bulk of the structural support. The inner skin provides structural support and clean walls to the interior of the structure.
All the materials work together in a beautiful harmonious efficiency to obviate the need for a frame.
Keep in mind that the plastic sheathing is 3/16” thick. When you think about how super thin and extremely lightweight this material is, the fact that it’s providing structural support is really something.
The construction of current dome
What follows is not a complete guide to how to build the dome but rather a general outline of how I broke down the geodesic geometry into a few easily assembled parts. The idea being that this methodology can be reused for other geodesic structures.
There is enough here for experienced makers to have a go but if you are really intent on making one of these domes please be careful and construct several paper models first.
One of my aims here is to make domes a little less scary to the less mathematically inclined.
Geodesic Geometry
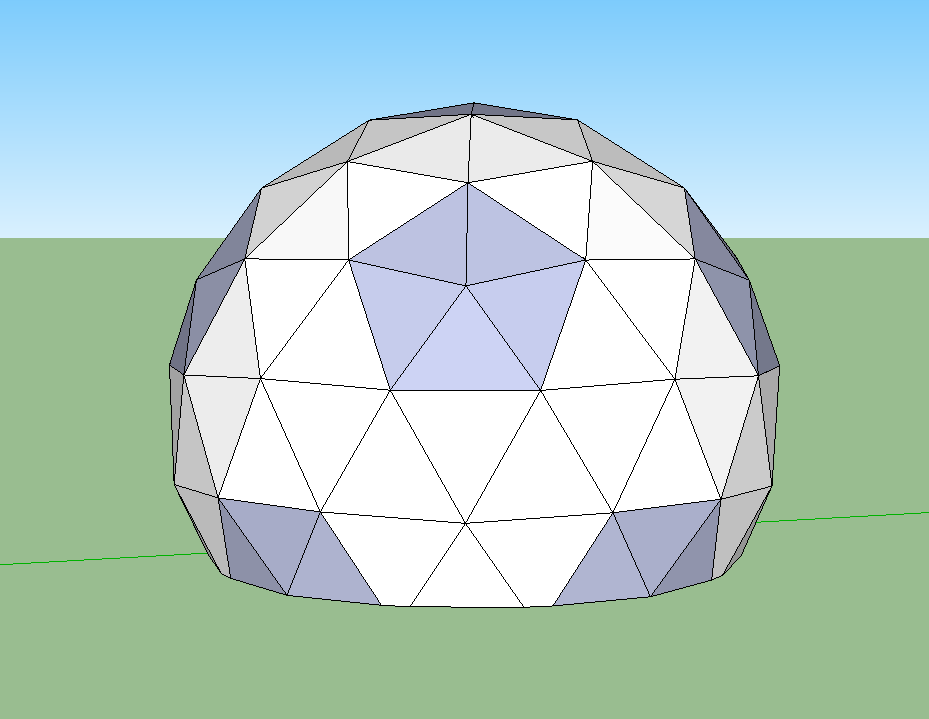
This is a basic 3v geodesic dome.
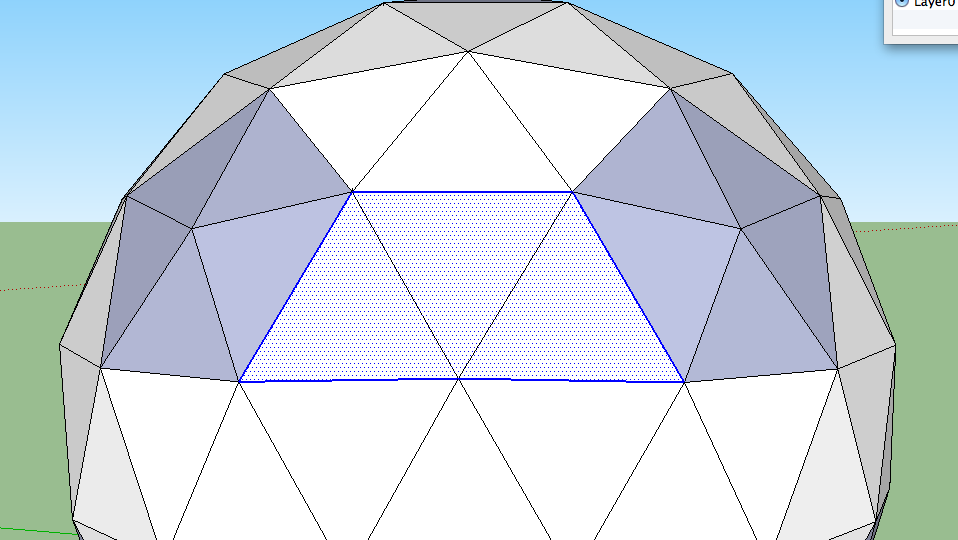
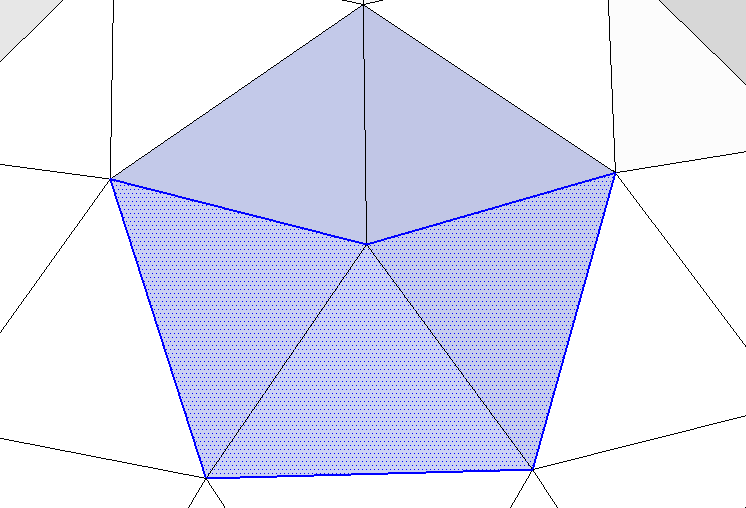
Geodesic domes initially look complex but there actually is simplicity here. If we look at the structure we can see some obvious repeating patterns. In fact, two shapes jump right out at us. The entire structure is made up of hexagons and pentagons. You can see them in the illustration below. The pentagons are purple and an example hexagon is outlined in blue.
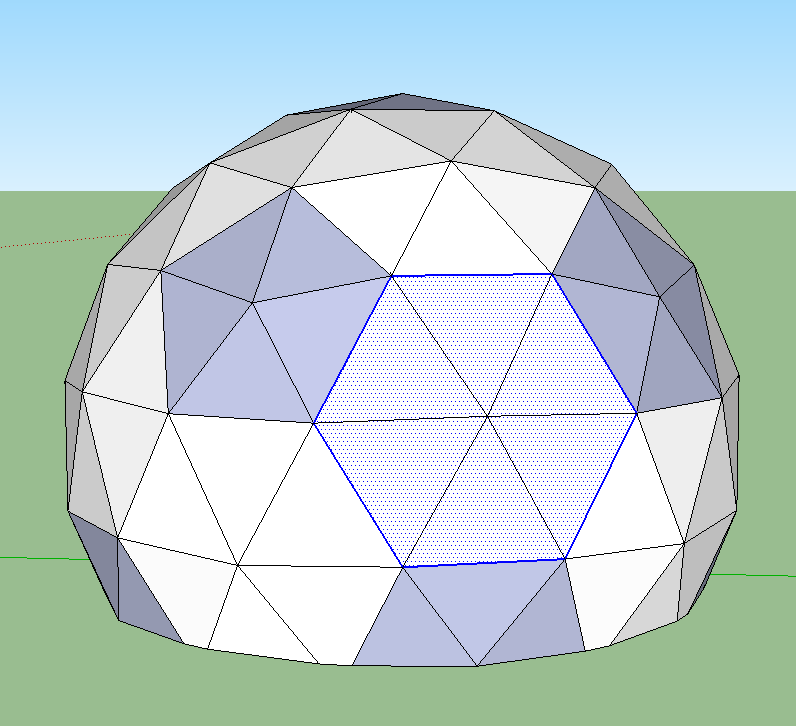
This pattern of hexagons and pentagons should look familiar. You are essentially looking at a soccer ball.

The soccer ball above has the same exact pattern of hexagons and pentagons as the geodesic model above. If one studies this you can see that the pentagons are islands in a sea of hexagons. All of the hexagons and pentagons in the dome are the exact same size.
What we need to do is make it easy to create these hexagons and pentagons out of 4x8 sheet material.
Laying out the hexagons
If we look at a one of the hexagons we can see that half of a hexagon will fit onto a 4x8 sheet nicely.
This half hexagon shape is repeated 30 times on the surface of the dome and it easily fits on a 4x8 sheet.
By fastening two of these shapes together we can create a one of the hexagons of the dome.
When you consider that we are going to have two plastic domes (interior and exterior) and 2 foam board domes for insulation. Having one shape that covers so much area is an effective simplification. We only need one pattern to create the sea of hexagons.
If we lay out this shape so that it fits on a 4x8 sheet of material this is what we get:
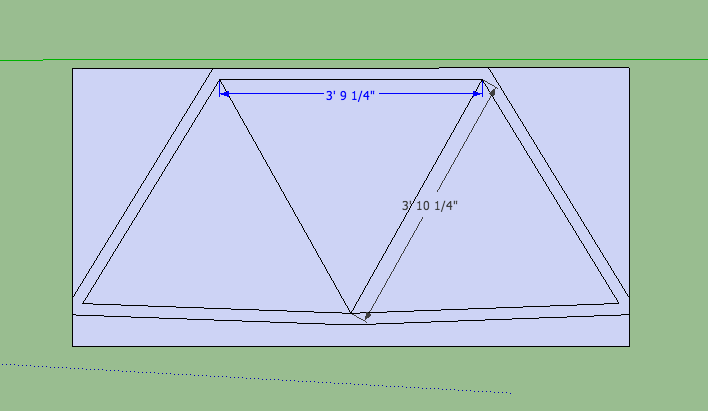
In the diagram above we have laid out the selected triangles from the dome model. In addition we have added outer lines that bound the triangles. These outer lines lay 2 inches from the edges outer edges of the triangles.
If you refer back to the photos at the start of this post you can see that the plastic sheets do not butt up edge to edge. In order to shed rain and be fastened to each other, the plastic sheets overlap each other as shingles on a roof would.
That’s why there are outer lines in the diagram above. They account for the overlap that is needed to provide for the shingling of the plastic sheets.
For the outer corrugated plastic skin we will layout out this pattern on a corrugated plastic sheet and drill holes where the vertices of the triangles are and then cut on the outer lines to obtain our final skin piece.
When we lay out these sheets we are going to be very precise about where we drill the holes because that determines how well the structure fits together. If they are off, there is a good chance that the structure will not fit together at all. The outer lines that create the overlap are much less important.
The blueboard insulation is cut into shapes just like the skin. But because the insulation doesn’t overlap we are going cut on the outer edges of the triangles.
The pattern above can be used to produce all the hexagons in the structure. Now we are going to address the pentagons.
Layouts for the pentagons
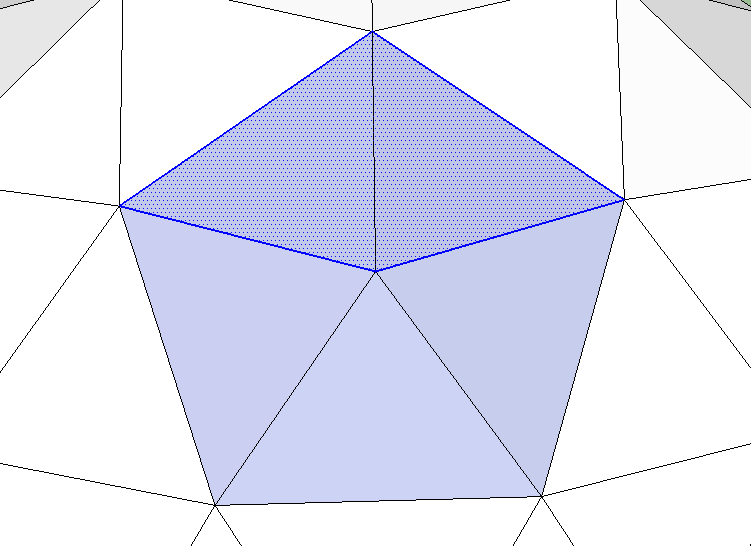
We essentially repeat the process above for the pentagons in the structure. We are going to map the pentagon to layouts that will fit onto 4x8 material.
Pentagons are not symmetric like hexagons so we are going to need two patterns to create the pentagons. Let’s divide the pentagon into two parts and lay them out. We’ll start with this diamond shape:
We can fit two of these diamond shapes into one 4x8 sheet as shown below:
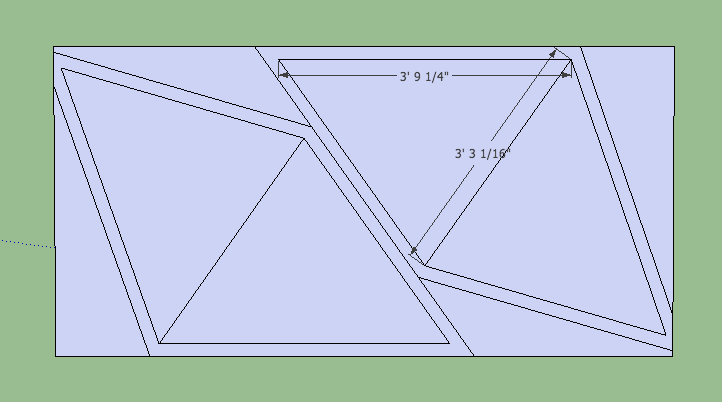
Next we have the lower part of the pentagon:
Which gets laid out on a 4x8 sheet like this:
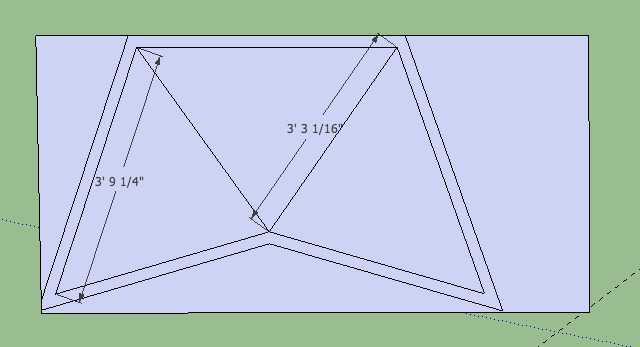
We can now make the pentagons in the dome.
Well here we are we three different layouts that we can use to produce most of the shell of the dome.
Three patterns!! 164 parts!!
The three shapes we derived above amount to a remarkable simplification in fabrication and construction. We have decimated the complexity of the dome.
This approach makes this dome among the most simple to build that I have witnessed. The part count for the whole shell (inner insulation, and outer) comes to 164 parts! The hubs are completely eliminated and replaced with simple bolts. The bolts account for all the necessary fastening needed to hold the shell together.
The parts of the dome are also extremely lightweight. You will need ladders or scaffolding but there is absolutely no heavy lifting involved.
There is the strain of knowing which parts go where but you literally can use a soccer ball as your model. Seriously, you can have one on hand to know whether you are currently making an hexagon or a pentagon.
More patterns
A few other patterns are needed to finish the shell. These patterns are based on the original three patterns.
If you are creating templates to trace and mark bolt holes you can just add the following patterns to those templates. Allowing you to cover mark out everything with three templates.
If you refer back to the dome model you will notice that the bottom row of triangles is truncated to allow the dome to be flat at the bottom. These bottom row patterns are simply truncated versions of two of the previous layouts.
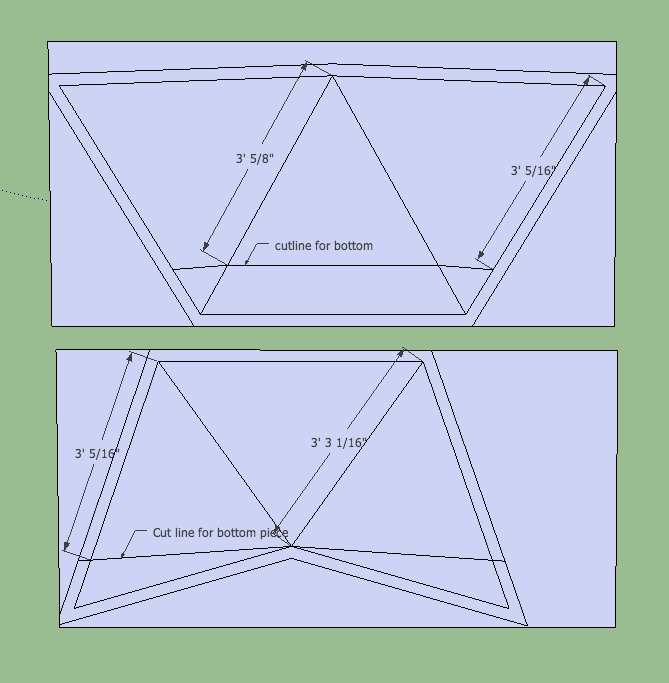
When you start building the dome you start with these pieces and place them alternating using one and then the other keeping the bottom cut lines down.
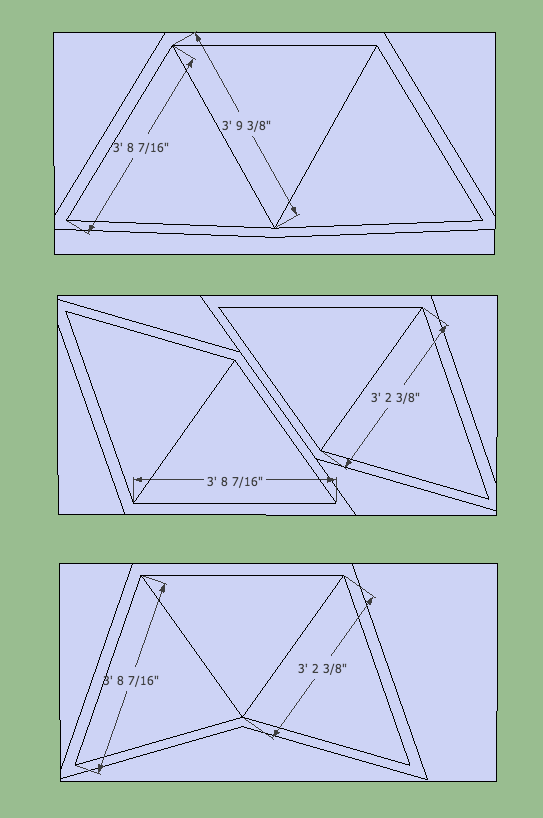
The inner plastic dome has the same three shapes but the bolt holes are just slightly closer to each other than in the original three patterns. This accounts for the smaller size of the inner dome.
The outer cut lines can stay the same as the previous patterns because they do not affect the shape of the final structure.
These are all the patterns needed for the shell of the dome.
Keep in mind I didn’t do any crazy math to calculate these lengths. I used Google Sketch Up. I imported a 3v geodesic model and then scaled it to the right size. I then took the measurements right from the model. No rocket science here just gratitude for the availability of fantastic easy to use tools.
Building the dome is essentially following the pattern on the soccer ball, recognizing whether you are currently creating a hexagon or a pentagon and placing the appropriate piece in place.
Other details
Of course, I have only provided insight into to the shell of the dome. This is my main novel contribution to this conversation. I have said nothing of doors, windows, ventilation, lighting etc. If there is enough interest I may do some follow up posts describing how I tackled these different challenges. But the materials are very easy to work with and thus amenable to all sorts of windows and doors.
Conclusion
Again, this is not a detailed guide to how to build a dome. I wrote this with the intention of making a summary of my experience available to other makers and alternative shelter enthusiasts. I was also hoping to make domes more approachable and less esoteric.
This blog post has been a long time coming. I’m really glad that I procrastinated this long. I feel much better about recommending a structure that I have experienced living in.
The dome I described performs admirably. If you are considering a canvas dome, teepee, or yurt you should consider building a frameless dome as well. It’s cheap, considerably easier to make, and in my opinion much more livable.
If you are starting a startup, you should consider building a dome office. If you need a workshop, art studio …
While I have made everything sound simple, every project has unforeseen complications. For example, when I was building this dome I built the 3/16” plastic outer shell first. It held itself up admirably but three days later a freak snowstorm dumped 17 inches of snow. Something that the completed structure can handle but not the eggshell that was standing. It collapsed and my friends and I spent a day trying to keep it up and the snow off of it. I am very grateful for their help that day.
Appropriate Shelter
One might think that I am saying that people should dump their heavy structures and live in inexpensive, easy to build lightweight ones. This is not my ideal.
My ideal is slow built hand crafted housing. Housing that is crafted and grown by a community with attention towards those who will be occupying it 5 generations later.
We don’t live in that world right now. We live in a world of mass produced system housing that treats efficiency as primary and where beauty is tacked on as an afterthought. Modern economics has pressured us to give up on the handcrafted home and pushed us towards efficiency, all the while retaining a cost to us and the environment that is a tremendous burden.
I am saying it is possible to hack the current system by creating homes that are absurdly efficient and ephemeral. Maybe that way we can free up time to create the things that have real lasting value.
Resources
Google SketchUp
Sketchup Dome Model
Geodesic
Math
Early attempts
I have iterated on this idea a bit.
![]() Don't ask. This is what total utter failure looks like.
Don't ask. This is what total utter failure looks like.

Comments
Please join the conversation on Hacker News https://news.ycombinator.com/item?id=6355488